
The toboggan gradually picked up speed as it slid down the slope. This was the best toboggan run in the area. A long run with no sudden dips or jumps. Just the thing for all the kids.
Alice’s yoga teacher said that when you are doing Extended Side Angle pose you have a long toboggan run from your fingertips to your heel. No bumps and no dips.
What is Extended Side Angle pose
This is a smooth toboggan run from your finger tips to your toes.
The Sanskrit name for Extended Side Angle pose is Utthita Parsvakonasana. It is one of the poses in the Ashtanga Yoga Standing series.
It stretches the groins, spine, waist, chest and shoulders. At the same time it strengthens the ankles, knees and legs. Extended Side Angle pose stimulates the abdominal organs and increases your stamina.
It is a relatively easy pose to move into.
How to do Extended Side Angle pose
You start at the front of you mat standing tall in Tadasana with your feet together and your hands resting at your side.
On an inhale breath you step out to the right side spreading your legs about a length and a half apart. Your left foot is turned to the side parallel to the end of the mat and pointing part way to the back of the mat. Your front foot is pointing at the back of the mat.
While facing the back of the mat lower your hips as you bend the front knee. Keep your knee over your ankle. Your back leg is straight with your foot flat to the floor.
Now that the legs are in place turn your torso to the side and lower the same arm as the leg that is in front of your towards your leg. Eventually your hand will come to your mat next to the little toe of your front foot.
To finish setting up for the pose turn your shoulders one above the other and raise your arm.
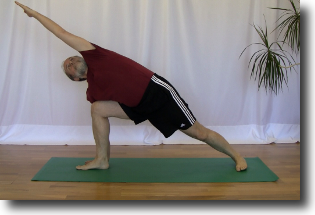
Make a straight line from your back heel, through your hips and shoulders up your arm to your fingertip. This is the toboggan run that Alice’s teacher was talking about.
What is the toboggan run
The Toboggan run extends from the fingertips all the way down to the heel of your back foot. It should be a straight line but this is not always the case.
Why is the toboggan run missing
Create the toboggan run by lowering your hips, moving your feet further apart and bringing your front knee over your ankle.
The most common reason for the toboggan run to be missing is stiff hips. Your hips are higher up in the air and the straight line is gone. The stiffness in the hips is caused by too much sitting. The muscles in the hips have become shorter and less flexible over time.
You can create the toboggan run in the pose but it is going to take time and a lot of work.
How to create the toboggan run
To get the hips in line and create the toboggan run you need to lower your hips towards your mat. You do this by bringing awareness to your hips and drawing them down.
Increasing the distance between your feet will also help to persuade your hips to move down.
Finally bringing your knee forward over your ankle will require your hips to move closer to the floor as well.
Use your breath to work with your edge in the pose. On the inhale move away from the safe but challenging edge. With your next exhale lower your hips, move your knee forward and approach the edge once more. This repeated but slow movement will gradually stretch and lengthen your muscles and tendons in the hips and eventually you will have a toboggan run.
When I lower my hips my front knee moves beyond my ankle
To keep your front knee over your ankle as you lower your hips, move your feet further apart. The lower your hip moves the lower your thigh moves and this moves your knee forward. Move your feet further apart to protect your knee from injury.
When I lower my hips, the little toes side of my back foot lifts off of the floor
Bring awareness to your back foot as your hips lower towards the mat. Shift the weight in your back foot to the outside, little toe side. These two actions usually help to keep your back foot flat to the mat.
If your foot is still tipping up on edge, it is time to stop lowering your hips and lift up slightly. To protect your back leg your foot must be on the floor.
Once again you can use your edge here to work on the flexibility you need to keep your foot flat to the floor.
When I lower my hips, my back knee starts to hurt
To protect your back knee engage the muscles of your thigh and put weight into the heel of your back leg. These two actions will straighten your back leg and protect your knee joint from injury.
Summary
Creating a straight toboggan run in Extended Side Angle pose is one of the goals of this pose. When you have that straight line from your fingertips to your heel you know that you have enough flexibility in your hips to get maximum benefit.
Next Step
Ask your yoga teacher to check you in Extended Side Angle pose. Do you have a ski jump with your hips up in the air or do you have a nice long toboggan run with your hips in line between your ankle and fingertips.
Additional Reading
In this article Why backing off will move you further in Parivrtta Parsvakonasana learn why less can bring you more in the future.
Learn more about protecting your knees in How to protect your knees in Side Angle pose
Learn how to use your edge to improve your yoga experience in the article How the rolling pin factor works with your edge.