
This pose requires a lot of twisting in your spine.
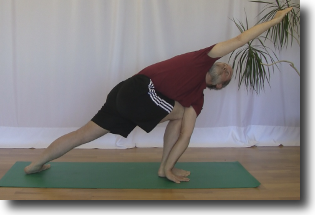
Finally the moment has come! Alice has been working towards this moment for a long time. She is finally going to be able to move on to the next stage of Parivrtta Parsvakonasana. Alice’s shoulder is resting beside her knee and the way is clear for her to put her hand on the floor beside her foot.
Alice struggles and she just barely gets her hand to the floor when her yoga teacher comes by and suggests that she back off so she can go further into the pose later.
Before we look at why Alice’s yoga teacher told her to back off in order to go further forward, let’s look at the pose that Alice is working on.
What is Parivrtta Parsvakonasana
Parivrtta Parsvakonasana is a standing pose with a strong twist in the spine. This pose is part of the Standing Series of Ashtanga Yoga and is done just after Parsvakonasana.
The name Parivrtta Konasana is Sanskrit which is pronounced “par-ee-vrt-tah parsh-vah-cone-AHS-anna” which in English means Revolved Side Angle pose.
The “Revolved” part of the pose is the twisting of your torso. You twist your torso to the side and attempt to get your shoulders one above the other when you are in the pose.
The “Side Angle” part of the pose is the lunging of your legs. Your legs are far apart with one leg bent and the other one straight.
Parivrtta Konasana strengthens and stretches the legs, knees and ankles. It also improves balance, stimulates the abdominal muscles and stretches the groins, spine, chest, lungs and shoulders.
Let’s have a look at how to do the pose in detail and then we will look at how to develop the twist in the pose and then finally why her yoga teacher suggested that she take a step back in order to move forward.
How to do Parivrtta Parsvakonasana
You start in Tadasana with your feet together, your arms at your side and your gaze straight ahead.
From here you inhale and step out to the right about a leg length and a half. Your back leg is straight and the foot is turned about 45 degrees towards your front foot. Your front leg is bent at the knee and your foot is pointing at the end of your mat. The heel of your front foot is in line with the heel of your back foot, your front knee is over your ankle and your hips are descending towards the floor as your front thigh comes parallel to the floor.
Once you have your legs set up you are ready to start working on the twist of your torso.
Turn your torso to the right and bring your left shoulder down on the outside of your right knee. Place your hand on the floor beside your right foot and bring your shoulders one above the other.
Once you have your torso in position raise your right arm and point about halfway up the wall. There should be a straight line from your wrist through your shoulder and hip to your ankle.
Finally turn your head bringing your chin towards your right arm and gaze towards the fingers of your right hand. Hold here for several breaths and then repeat the pose on the other side.
The major challenge with this pose is developing enough flexibility in your spine so you can twist your torso far enough for your left shoulder to come to the outside of your right knee.
How to develop the twist
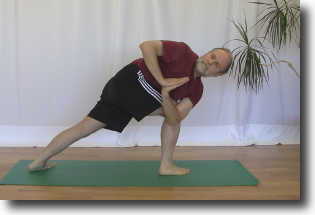
This intermediate version helps you work on the twist in your spine.
Alice has been doing this intermediate version of the pose for a while now.
First get setup
Following the description above set your legs up for the pose and turn your torso to the right side so that your left shoulder is above your right thigh.
Before lowering the right side of your torso to your thigh, bring your palms together close to your chest with your elbows bent out to the side.
Now that you have your arms in place, lower your torso down and bring your left arm against the outside of your right knee. Slide your left arm as far down the outside of your right knee as it will go. Now you are ready to develop the twist in your spine.
Now it is time to work on developing your twist
There are several actions you take in this position to develop the twist in your spine. You start at your hips and work all the way up to your head.
First you turn your hips as far to the left as they will go. This establishes the base of your twisting action.
Next you firm Uddiyana Bandha and turn your abdomen to the left.
Then you lift your ribs and turn your bottom left ribs towards your right thigh while at the same time taking your right ribs up and back. This adds more of the twist that you are developing.
Continuing to work your way up your torso you press firmly into your palms, push your left arm against your right knee and move your right shoulder back. You are attempting to get your shoulders one above the other.
Finally turn your head and look up towards the ceiling.
Each of these actions adds a little bit to the twist in your spine and it spreads the stretching throughout the entire length of your back.
Use your edge and the feedback from the muscles in your back to guide you as you develop the twist in your spine. As your spine becomes more flexible it will be time to move on to the full pose.
When is it time to move on to the full pose
You know you are ready to move on to the full pose when your left shoulder is resting on the inside of your right knee and your shoulders are one above the other.
Why Back Off
– your shoulder is not far enough beyond your knee
– develop your twist further
– less struggle when you move on
At this point you move on to the full pose. Now you will be resting your left hand on the floor beside your right foot with your right arm pointing half way up the wall in front of you.
Alice is struggling to get her hand on the floor beside her foot. Her yoga teacher told her it is time for her to back off and try again later.
Why back off
Alice needs to develop even more flexibility in her spine. Even though her shoulder is outside of her right knee, it is not quite enough.
She needs more flexibility in her spine to get her left shoulder even further on the outside of her right knee enough for her left hand to easily to the floor beside her right foot.
When you move to put your hand to the floor you are lowering your torso down as well. This movement requires even more rotation in your spine. As your torso lowers down to your knee it causes your hand to move further away from your foot.
Once you move to put your hand on the floor you lessen your ability to develop the twist further in your spine.
Now is the time to back off and return to the previous position with your palms together and continue to develop the twist in your spine.
Keep checking each time you enter the pose to see how easily your hand is coming to the floor beside your foot. Eventually enough flexibility will develop in your spine and you will be ready for the full pose.
Summary
Moving on to soon in Parivrtta Parsvakonasana can slow down your progress. Check to see how easily your hand is coming to the floor beside your foot. If it is a challenge, it is time to back off and stay with the intermediate version of the pose with your palms together next to your chest and your elbows pointing up and down.
Alice will discover one day that her hand is coming easily to the floor beside her foot. Then it will be time to move on to the full version of the pose.
Next Step
Ask your teacher to check your progress in the pose. They will be able to tell if you are ready to stay in the full version of the pose or if you should back off to the intermediate version.
Additional Reading
In the article How to protect your kness in Side Angle pose you will learn how to setup your legs safely for Revolved Side angle pose.
For another view on developing your twist read How to improve your dancing in this standing twist
This article How to use the play block technique to do a twist gives you a technique to use to safely move into any twisting pose.
Using the feedback from your body is important to protect you from injuring yourself. Read Goldilocks and the 3 bears find the edge to learn about your edge and using it in your yoga practice.