
This pose looks like a right angle triangle.
“Look at the triangle that I drew!” Alice’s nephew said as he ran up to her. Alice had a look at the triangle. One long side rising up from the base and another shorter side dropping straight down to the base. “It is called a Right Angle Triangle” he said.
“It looks exactly like one of my yoga poses.” Alice said “It is called Extended Side Angle Pose.”
What is Extended Side Angle pose
Extended Side Angle pose is know as Utthita Parsvakonasana (pronounced oo-TEE-tah parsh-vah-cone-AHS-anna) in Sanskrit. Utthita means extended and parsva is side or flank and kona means angle.
Side Angle pose is part of the Standing series of Ashtanga yoga. It appears early in that series.
Why do Extended Side Angle pose
Utthita Parsvakonasana strengthens and stretches your legs, knees, and ankles. It stimulates your abdominal organs. It also stretches your groins, spine, waist, chest and lungs, and shoulders. In addition it helps to increase your stamina.
It is a fairly straight forward posture to do.
How to do Extended Side Angle
You start in Tadasana, standing tall with your arms resting at your sides, a slight gap between your feet and your gaze to the horizon.
From here you inhale and step out to the right. There should be about a leg length and a half between your two feet. Your left foot is turned inwards towards your right foot about 45 degrees. Your right foot is pointing towards the far end of the mat and the heel of your right foot is in line with the heel of your left foot.
As you exhale, bend your right knee bringing it over your right ankle. Lower your hips towards the floor and bring your right hand to the floor beside the little toe of your right foot.
Finally turn your hips and torso up to the side so that your left shoulder is above your right. Now bring your left arm up beside your head and point halfway up the wall. There will be a straight line from your fingertips to your shoulders, through your hips and on to your back foot.
To finish the pose off turn your chin towards your left arm and bring your gaze towards your left hand.
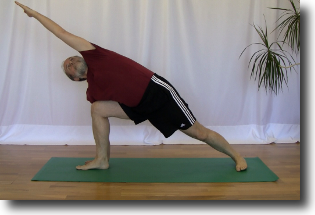
This is the right angle triangle that Alice and her nephew are talking about. The left side of your body in a straight line from your left foot to your left fingertips and then straight down to the floor with your right arm.
But not everyone manages to make a perfect right angle triangle the first time they attempt this pose.
But I can’t get my hand to the floor
Put your elbow to your knee if you can not get your hand to the floor.
Alice’s hips are too high in the air when she does the pose. There is a bump in that long line from her fingertips to her back foot. She is unable to get her right hand to the floor beside her right foot because her hip is too far up in the air.
There are a couple of things that Alice can do to help with this problem and they will help you too. You can modify the pose while your hips are getting more flexible.
- elbow to knee
- Hand to block
- Hand to floor
You start with the first modification, elbow to knee, and move on from there.
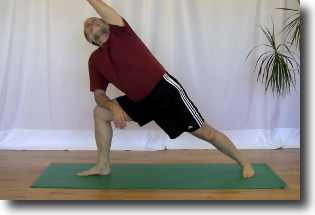
1. Elbow to knee
When you enter the pose rather than attempting to put your hand on the floor beside your foot, bring your right elbow to the side of your right knee and let your forearm point down towards the floor. Once you have this base established you bring your left arm up and make that long straight line from fingertips to back foot. You will discover that the line is now smooth and you have a good looking right angle triangle.
There is a common mistake that you have to watch out for when you do this modification. Do not let your body sink down into your arm. When you do this your shoulder will rise up to your ear and you will end up stressing the muscles in your neck and shoulder.
To avoid the sinking torso problem lift the torso up and move your shoulder down your back towards your hips.
Eventually your hips will get more flexible and you will be ready to move on to the next stage, and try hand to block.
2. Hand to block
For this modification you need a foam or wooden brick that is 9x6x3 inch on a side. Place this block on the floor beside your right little toe. You want the top surface to be 9 inches away from the floor.
When you enter the pose put your right hand flat on the block with your fingers pointing forward. If this is already an easy arrangement for you, then turn the block so the top is 6 inches away from the floor and use that height.
Your hips will continue to get more flexible. Keep decreasing the height of the block until the top is only 3 inches from the floor. This is the lowest height available. Once you can rest your hand easily on the block at this height it is time to move on to the final modification and put your hand on the floor.
3. Hand to the floor
Remove the block and reach for the floor with your hand. You may start out with just your fingertips touching but eventually your hip flexibility will improve and you will progress along your hand until your palm is resting comfortably on the floor.
Once you get your hand resting on the floor you may discover another problem.
But the extra flesh on my chest gets in the way
There is a lot of flesh getting squeezed between your thigh and your chest as you lower down to put your hand on the floor. You need to get this extra flesh out of the way without being too obvious about it.
You can accomplish this by first bringing your chest and shoulder down on the inside of your right knee. From here lift your chest up and move your shoulder to the outside of your thigh. This movement will keep all of that extra flesh to the side out of the way and you will be able to rest your chest comfortably on your thigh. Once you get your chest in place bring your hand to the floor beside you big toe.
Summary
Extended Side Angle pose can be a challenging pose to do well even though it has no twisting or binding involved. It will take you a while to get your hips flexible enough so that you can get your hand to the floor beside your foot. There are a few modifications that you can do to protect your self from injury while your hips are getting more flexible. Start with your elbow on your knee, then move to putting your hand on a block and then finally bring your hand to the floor.
Next Step
Ask your teacher to help you with the modifications to Utthita Parsvakonasana. They will be able to tell you if you have a right angle triangle as good as Alice’s nephew drew for her.
Additional Reading
Read How to protect your knees in Side Angle pose to keep your knees from injury.
There is a revolved version of this pose and you can learn about by reading How to improve your dancing do this standing yoga twist
You need to pay attention to the feedback from your body when you do this pose to insure that you do not go to far and injure yourself. Read Goldilocks and the 3 bears discover the edge to learn more.