
Paschimottanasana is a forward fold that you do with a slightly curved back.
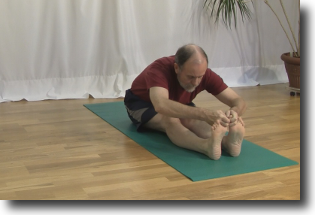
Alice is attempting to do Paschimottanasana, which is a simple forward fold. Her back is in a big curve like a bow and her hips are tipped way back behind her. Her back is curved almost in a half circle. This is not good.
This will put a lot of pressure and stress on her lower back muscles and if she continues she will injure her lower back muscles and possibly herniate one of her discs.
If Alice follows some simple instructions she will be able to protect her lower back muscles from injury when she folds forward in this pose.
What is Paschimottanasana
Paschimottanasana is a seated forward fold. It is the first seated posture in the Primary Series of Ashtanga Yoga.
Paschimottanasana is a Sanskrit word which means “Intense Western Stretch”. This is a strange name, until you realize that traditionally a yoga practice was done at sunrise facing the sun as it rose above the horizon. The front of the body was facing east and the back of the body was facing west.
The name of the pose is referring to the stretch that the back muscles are getting when you fold forward.
Paschimottanasana is a very simple posture in appearance. There is no binding, no twisting, no lifting. You are simply sitting on the floor and bringing your torso forward towards your thighs.
How to do Paschimottanasana
You start in Dandasana with your legs together and straight out in front of you. The back of your hips should be rising straight up out of the floor and your feet are pointing straight up to the ceiling as well.
Next you tip the top of hips forward slightly, bring your torso forward towards your feet and at the same time bring your hands forward along your legs towards your feet.
Keeping your torso as straight as possible tuck your chin slightly and gaze towards the big toes of your feet. You hold here for several breaths.
Eventually your torso will be resting on your thighs and your hands will be holding your feet.
There are three different hand positions once your hands are able to reach your feet. Each successive hand position requires more flexibility in order to accomplish it safely.
The first hand position is to hold the big toes with your first two fingers with your palms facing each other.
The second hand position is holding the sides of your feet from the little toe side. Your thumb is across the base of your toes and your fingers are on the sole of your feet.
In the third position your arms go around the little toe side of the feet and you interlace your fingers. You are not holding the feet at all in this third position.
Attempting to hold the feet in one of these three positions before there is enough flexibility can result in injury to your lower back muscles.
Why is your lower back at risk in this pose
When Alice attempts to hold her feet her back is bent into a big curve like a bow. This big curve is the source of the problem. The natural curves of the spine are lost when your back is in a big bow.
Her lower back muscles will become overstretched as she attempts to fold forward. If she tries too hard to fold forward with this bow in her back she could herniate one of the discs in her lower spine.
This bow in her back is a result of her hips being tipped backwards rather than straight up and down. Her hips are tipped backwards because of shortened hamstrings. The shortened hamstrings are pulling the top of her hips backwards and down towards the floor.
What are the Hamstrings
The hamstrings are a very long muscle in the legs. They attach on the back of the leg just below the knee at one end. The other end of the muscle attachs on the back hip just above the sitz bones.
The sitz bones are the part of the hips that you sit on when you sit down. They are the bottom most point of the hips when you are sitting.
It is the Hamstring muscle that has been shortened over time and is causing the problem in this pose.
How to tell if you have short Hamstrings
Sit in Dandasana with your legs together and straight out in front of you.
Bring the top of the hips up over your sitz bones. The back of your hips should be rising straight up off of the floor with your shoulders above your hips. Your back is straight and your spine has its natural curve. Bend your legs if necessary.
Now straighten your legs and draw the toes of your feet towards you until your feet are straight up and down. Imagine pushing your heels into the wall with your toes pointing straight up to the ceiling.
If when you pull your feet up to a vertical position the back of your hips are pulled down towards the floor then you have short hamstring muscles.
If this happens to you then you are part of the majority of people that start yoga.
Why do most people have short Hamstrings
Our North American lifestyle is largely to blame for our shortened hamstrings. We sit in chairs almost all of the time. We sit down to eat. We sit down to drive to work. We sit down at work. We sit down to watch TV. We spend a lot of our waking hours sitting.
Our hamstrings get shorter and shorter as a result of all of this sitting. We are not doing any activity that requires the hamstrings to stretch.
Even though we all start a yoga practice with short hamstrings there is a simple change we can do to protect our lower back and begin stretching the hamstrings.
How to protect your lower back
The first thing Alice needs to do is to get the back of her hips straight up and down. She needs to remove the backward tilt of her hips. She can do this by bending her knees upwards and bring the heels of her feet closer to her hips.
Bending the knees upwards and drawing the feet closer to the hips takes the pressure off of the hamstrings allowing the hips to tip forward and come up to a vertical position.
Alice should only bend the knees just enough to permit her hips to get to the vertical position. Once her hips are in a vertical position she can then continue with the folding forward portion of the posture.
Gradually over time Alice can move her feet forward a small amount at a time until she feels a stretching sensation in the hamstring muscles. As the hamstring muscles lengthen she will be able to straighten her legs some more.
How to use the edge for rapid progress
The edge is that place in a yoga pose where you are comfortably challenging your muscles. If you are too far back from the edge you are not challenging your muscles at all and if you are too far beyond the edge you are in great discomfort and at risk of injuring your muscles and joints.
You hold your body in this comfortable yet challenging place as you complete your yoga pose.
There are other areas of your body that are at risk in this posture.
Next Step
Ask your teacher to check that your hips are in the right place before you fold forward in Pashimottasana and you will be able to avoid the big bow in your back like Alice had when she tried the pose.