
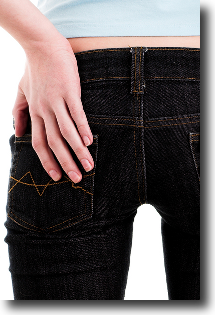
Use your hip pocket for an easier frog pose.
Alice has been trying to get her arm and hand in the right place for Bhekasana (Frog pose) and is having no success. Her big problem is that she can’t see what her arm and hand are doing as she reaches behind her back to take a hold of her foot.
Her teachers tells her that she needs to follow the hip pocket technique to get her hand in the right place for Bhekasana.
What is Bhekasana
Bhekasana is is back bend that stretches your Quadricep muscles. It is one of the yoga poses in the intermediate series of Ashtanga Yoga.
Bhekasana stretches the entire front of your body, your abdomen, chest, and throat as well as your ankles, thighs, groins, and the psoas muscles, the deep hip flexors, of your hips.
It also strengthens the back muscles, improves your posture and stimulates your abdominal organs.
While it is an easy looking pose to enter, it is difficult to get your arm in the best position for maximum benefit.
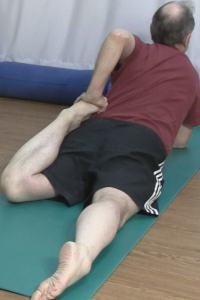
Hugh dEntremont demonstrating Bhekasana (frog) pose
How to do Bhekasana
You start by laying face down on your belly with your legs spread apart. Your legs are far enough apart so that your feet are just off of your mat.
Now bend your knees and bring your heels towards your hips. At the same time lift your shoulders up off of the mat and reach back with your hands and place your hands on top of your feet.
Once you have your hands on your feet you lift your shoulders and ribs higher while at the same time bending your elbows up in the air and lowering your heels towards the floor beside your hips.
Where is the challenge
Alice is finding it challenging getting her arm in the correct place and her hand on her foot so her elbow can bend up and she can push down on her foot while at the same time lifting her torso up.
She can use the hip pocket technique to figure out the correct position for her arm and hand.
What is the hip pocket technique
You use the hip pocket technique to get your arm in the correct alignment when you grab your foot with your hand in Bhekasana.
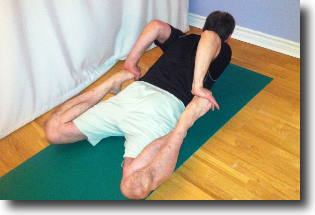
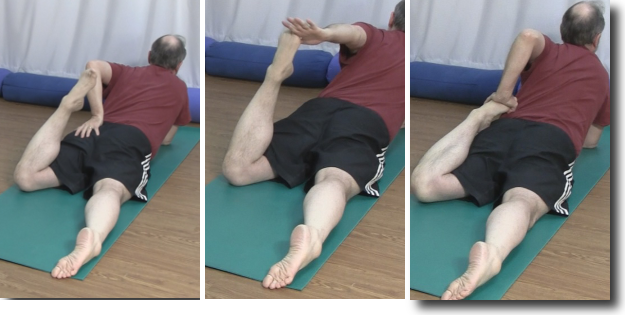
Bhekasana one leg at a time.
To learn the hip pocket technique you work with one arm at a time.
Lift your shoulders and chest from the floor. Now support your lifted torso by placing your right forearm on the floor parallel to the front of your mat with your elbow directly under your shoulder. This will support your back bend while you focus on getting your arm and hand in the correct position with the hip pocket technique.
Now that your back bend is in place, spread your legs apart and bring your left heel up and down towards your left hip.
Everything is in place now to implement the hip pocket technique
How to do the hip pocket technique
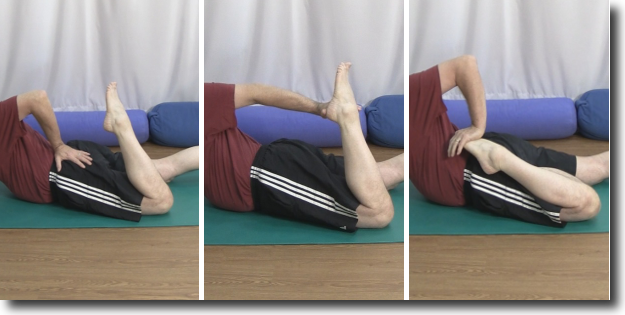
Start with your hand on your hip, move it up to your big toe and rotate it on top of your foot.
To enter the hip pocket technique place your left hand on your hip with your palm down and your fingers pointing towards your leg and your elbow bent slightly upwards.
Next lift your hand up off of your hip keeping your palm flat until your thumb makes contact with the big toe side of your left foot. Once you are in contact with the side of your foot bend your elbow up some more and rotate your hand and fingers across the top of your foot from pointing at your ankle to pointing towards your toes.
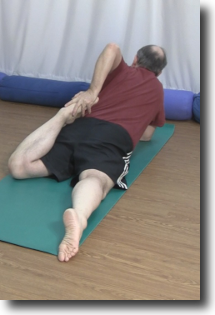
You now have your hand and arm in the best position to gain maximum benefit from Bhekasana.
Use the hip pocket technique to get your hand on foot and over you toes.
But what do I do if I can’t get my hand to rotate?
Sometimes you can’t get your hand to turn around.
To successfully get your hand to rotate on top of your foot from fingers pointing at your ankle to fingers wrapping over your toes you need have a good bend in your elbow.
In order to get a good bend in your elbow you need to bring your shoulder higher up and lower your foot closer to your hip. To get your foot closer to your hip you need to stretch your Quadricep.
You can encourage your Quadricep to stretch by applying pressure to the top of your foot with your hand even though your fingers are pointing towards your ankle. Use your Edge to gently apply stretching pressure to your Quadricep muscle as you slowly breathe in and out.
Eventually your Quadricep will have stretched enough that your forearm is closer to vertical and your hand will be able to turn around and wrap around your toes.
Now you can continue stretching your Quadricep and lower your foot towards the floor beside your hip.
Summary
Bhekasana is an excellent pose for stretching you Quadricep muscles and strengthening your back.
Once Alice has her arm and hand position sorted out using the hip pocket technique she will be well on her way to lengthening and strengthening her Quadriceps.
Next Step
Ask your teacher to help you with the hip pocket technique. They can see what is going on behind your back much easier than you can. They can help guide your hands to the correct position on your feet.
Additional Reading
Another Quadricep stretch is Triang Mukha Eka Pada Paschimottanasana. You can learn more about this pose in the article How to remove the leaning tower of Pisa effect from your one leg forward fold pose
Stretching your Quadriceps in Bhekasana will benefit greatly from following your Edge. The article Why you should follow the Sun’s approach to achieve your yoga goals safely will teach you more about your Edge and how to use it in your yoga poses.