
You can avoid the face plant effect.
The floor was rushing up towards Bob really fast. Bob was afraid that he was going to do a face plant again. He did not have enough strength in his arms and shoulders to hold his body off of the floor. At the last second Bob turned his head to the side and avoided smashing his nose into the floor.
There is a better way to develop the strength you need to do Chatarunga Dandasana and you can avoid a face plant every time.
What is Chatarunga Dandasana
Chatarunga Dandasana is one of the poses that make up a Sun Salute. It also is part of the vinyasa sequence in Ashtanga yoga.
Chatarunga Dandasana is Sanskrit for four limbed staff pose. The staff part of the pose is your spine and the four limbs of the staff are your hands and feet which are the only parts of the body that are touching the floor.
Chatarunga Dandasana helps to strengthen your shoulders, back and abdominal muscles. To do it successfully requires a certain amount of strength in those muscles to hold your body off of the floor in a hover position.
How to do the pose
There are three stages to Chatarunga Dandasana.
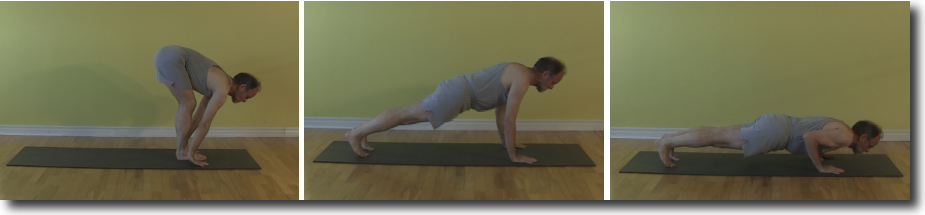
When doing a sun salute you enter this pose from Uttanasana which is a standing forward fold. In Uttanasana you have your feet together and your hands on the floor beside your feet. If possible you have your legs straight. If you can not get your hands on the floor with your legs straight then you need to bend your legs. You have to have your hands on the floor in order to enter to do Chatarunga Dandasana.
Now you take your legs back about the length of your body and you enter high plank. Here your arms are straight with your shoulders above your wrists, your hands flat to the floor with your fingers spread and pointing straight ahead. Your body is in a straight line from your head through your shoulders, hips and legs to your feet. You are on your toes with your heels pointing towards the ceiling and there is a small space between your feet.
From here you enter the pose by bending the elbows backwards and lowering your body towards the floor. You hold the body just above the floor with your shoulders the same height above the floor as your elbows. Your body continues to be in a straight line from your head through your shoulders and hips to your feet like you were in high plank.
You hold here for several breaths.
Most people discover that they are lacking the strength they need to hold their body above the floor.
What is the problem with the pose
Lowering down from high plank to Chaturanga Dandasana and hovering just above the floor requires a lot of strength in the shoulders, back and abdomen.
When you first attempt to do this pose you will discover that you are unable to hold your body off of the floor and this is when the face plant will happen unless you do something to prevent it.
How to prevent the face plant
There are three stages you go through in this pose to develop the strength you need to successfully and safely come to hover.
The three stages are know as:
- Knees, Hips, Chest
- Slow down
- Hovering
You move gradually from one stage to the next over time as your practice this pose.
Stage 1 – Knees, Hips, Chest
In this first stage you have the least amount of upper body strength. To prevent the face plant you lower your body to the floor in stages.
From high plank with your arms straight and your body in a straight line you gradually lower your body to the floor by first dropping your knees to the floor followed by your hips and then your chest.
As you are lowering your body in this fashion you bend your elbows backwards and keep your elbows next to your side.
In this stage your body is resting on the floor and not hovering. You strengthen your upper body by slowing the lowering of your knees, hips and chest to the floor.
Gradually over many repetitions some strength will start to develop and you will be able to hold your chest off of the floor and then later you will be able to hold both your chest and hips off of the floor. When you start holding your hips and chest off of the floor you will be ready to move on to the next stage.
Stage 2 – Slow Down
You know you are ready to attempt this stage if you can hold your body in a straight line as you bend your elbows and start to lower your body towards the floor.
As you lower down towards the floor you discover that you can slow your descent but you can not stop it. Turn your head to the side and let your body come all the way down to the floor.
In this stage you are working to slow down the descent and eventually have your body pause for an instant before it comes to a rest on the floor. It is important in this stage that you do not let your body sag. You need to keep it in a straight line.
Once you start to pause in ythat escent to the hover position you are ready to move on to the next and final stage , the hover.
Stage 3 – Hovering
Now you are in the final stage of strength development in this pose. Your body is in a straight line, your elbows are bent backwards beside your body as you lower down with control to the hovering position.
You stop your descent to the floor with your shoulders and hips the same height as your elbows above the floor and you hold here.
Over time you will be able to hold this position for more than an instant. Once your are able to hold this position for several breaths you have completed the strength development and you are able to successfully complete the pose.
There are however several common mistakes that you can make along the way that could hurt your body.
Some Common mistakes
— Let your body sag
This problem occurs when you are in high plank and your body is not in a straight line. Your hips have dropped down towards the floor and your head has dropped down towards the floor as well. This can cause stress to the lower back muscles if the hips are sagging down and in your shoulder and neck muscles if your head is hanging down.
You need to work to keep your hips and head lifted and your body in a straight line. This sagging is a sign that you are in Stage 1 of this pose.
— Lift your head
You may discover that lifting your head will prevent a face plant. With your head lifted only your chest will hit the floor when you lower down.
While this is a good way to save yourself from a face plant you are putting a lot of stress on your neck and upper back muscles.
You should keep your neck long and straight to avoid stressing those muscles. The head should be in a neutral position extending from the neck. The gaze is down the nose towards the floor.
— Your elbows are away from the body
This is quite a common problem. You will end up injuring your elbows if you do a lot of Sun Saluted with your elbows away from your ribs. The ligaments and tendons in the elbow joint are being stressed unequally and they will eventually start to hurt and you will end up tendonitis or tennis elbow.
You can avoid this problem if you make sure that your elbows actually brush your ribs as you lower your body towards the floor.
— Your body is too close to the floor
When you lower your body down and you are hovering just above the floor you can cause stress in your shoulders if your shoulders and body are below your elbows.
You want to keep your shoulders and your hips at the same height as your elbows. You should feel your elbows pressing into your ribs about in the middle of your side.
Summary
Follow the three stages of Chattarunga Dandasana and you will save your face from crashing into the floor every time and before you know it you will be doing the pose without a problem.
Next Steps
Your teacher can help you work through the stages and tell you when you are ready to safely move on to the next stage.