
Use the Redwood technique to get properly aligned in this pose.
Do you ever wonder why sometimes your wrists hurt when you do Upward Facing Dog and that other times they do not hurt at all. What is different between one time and the next. How can you adjust yourself in the pose to always avoid the pain in your wrists.
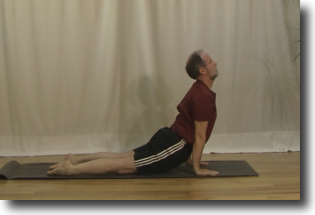
What is upward facing dog
Upward facing dog (Sanskrit – Urdhva Mukha Svanasana) is one of the nine poses of the Sun Salute series. A Sun Salute consists of a series of poses that are done to the breath. You inhale and do one of the poses and then you exhale and move on to the next pose. Upward facing dog is one of the poses in the middle of the Sun Salute series.
How to do upward facing dog
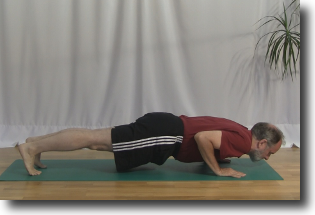
You enter upward facing dog from Chaturanga Dandasana
In Chaturanga Dandasana you are hovering in low plank with your body off of the floor and just your hands and feet on the floor. If you are lacking in upper body strength your body will be resting on the floor instead of hovering just off of the floor.
From Chaturanga Dandasana you start inhaling and lift your shoulders and torso up and straighten your arms. You move your hips forward toward your arms as you lift your shoulder up toward the ceiling. You roll over your toes and bring the top of your feet toward the floor as you continue to straighten your arms. You gaze toward the horizon.
Your shoulders are above your hands.
In the Redwood Technique the roots are the foundation of the tree.
In the Upward facing dog posture the hands are the roots of the posture. Depending on where you have placed your hands you are either comfortable or your hands could be bothering you.
How you injure your hands in upward facing dog
The hands are the root of this posture. Most of the weight of the pose is resting on your hands. There are several things that can be done wrong that will cause injury to your wrists.
Your hands are not flat to the floor
Usually the top of the palm by the first finger is raised off of the floor. This will shift most of the weight to the outside edge of the wrist.
Your hands are turned inward or outward
This will result in your wrist being twisted and the weight will be shifted to the inside or outside of the wrist.
Your hands are not under your shoulders
Your hands are too far forward, too far backward or too wide or too close together. Again this will result in all of the weight shifting to the inside or outside of the wrist once more.
Using the Redwood Technique you can correct the weight distribution and prevent injury to your wrists.
The Redwood Technique protects your hands
The Redwood technique has two major components. The roots and the trunk. Your hands are the roots and your arms are the trunk of the tree. Getting these parts of the tree correctly in place will reduce your risk of injury to your wrist.
The most important part of the Redwood technique is the roots.
The Hands are the Roots of the Tree
The Redwood spreads its roots as wide as possible. You need to do the same thing with your hands. Spread your fingers as wide as possible. Feel a stretching in the palm of your hands. Turn your hands inward or outward until your wrist creases are parallel to the front of the mat. In addition your fingers are spread apart and pointing straight ahead.
Once you get the fingers spread you need to get your hands flat to the floor. Focus on pressing the thumb and the knuckles of the first finger to the floor.
Now that the hands, the root of the Redwood technique, are spread wide and flat to floor it is time to move on to the arms, the trunk of the Redwood technique.
The arms are the trunk of the tree
The trunk of the tree needs to grow straight up from the roots to the sky.
The hands are under the shoulders. They are not too far apart, nor are they too close together. Your shoulders are directly above your wrists. Move your hands closer together or further apart until they are directly under your shoulders.
When you get the hands in the correct place the weight on the wrists will be evenly spread between the inside and outside. There is more weight distribution left to do.
The tree is balanced over its roots
In the Redwood Technique you distribute the weight of the tree trunk evenly over the roots of the tree.
Spread the weight of the body around the hand. Press the finger tips into the mat and distribute the weight of the body between the wrists and the top of the palm. Also the weight should be shared equally between the inside and outside of the wrists.
But my wrists still hurt
In some cases there may be a wrist injury that you need to protect. Usually the wrist is sore or the angle between the hand and the arm is causing the pain. There are two ways that you may be able to alleviate the pain in your wrist.
Use a foam or cork wedge
Put the thick end of the wedge under the wrist. The wedge should support the full length of the hand from the fingertips to the wrist.
Use a small sand bag
Put the sand bag under the wrist. The wrist rests on the sand bag and the rest of the hand rests on the floor.
Both of these techniques will shift more of the weight from the wrist to the top of the palm and they also lessen the angle between your palm and your arms.
Summary
Implementing the Redwood Technique will help to prevent injury to your wrists when you do Upward Facing Dog.
Flatten your hands, the roots, and spread the fingers wide.
Get the shoulders, the trunk, directly above your wrists by moving the hands, inward, outward, forward and backward.
And finally spread the weight all around the your hands.
Next steps
Check with your teacher to find out if you are implementing the Redwood Technique properly.