
Your front knee is more at risk than your back knee.
Have you ever done Trikonasana and have your knees start to hurt? Sometimes it’s the front knee only and other times it is both the front and the back knee. Have ever wondered if there is something that you can do to prevent your knees from hurting?
There are a several things that you can do to protect your knees and prevent them from hurting.
What is Trikonasana
Trikonasana is one of the standing poses that appears early in the Asthanga Standing series. It is a fairly straight forward pose to attempt. There is no binding or twisting in this pose.
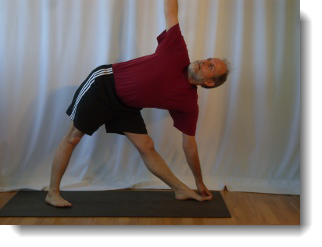
Trikonasana translated from Sanskrit means triangle pose. As you can see in the picture to the right the legs form a triangle.
How to do Trikonasana
You move into Trikonasana by standing in Tadasana with your arms by your side, your big toes touching and slight gap at your heels.
Next you step your feet about a leg length apart, turn your right foot to point towards the end of the mat and turn your left foot to point towards the side of the mat and slightly towards the front of the mat. The heel of your front foot should line up with the heel of your back foot.
Now turn your hips and body to face your right leg, tip your hips forward and down, reaching down with your right hand and place it on your shin or hold the big toe if it is within reach.
Finally you turn your shoulders and hips one above the other and lift your left arm up and point towards the ceiling, turning your head look at your left hand. Your gaze is towards the thumb of your left hand.
Once you get into the pose let’s have a look at your knees and see how they are at risk.
How are your knees at risk in this pose
There are three ways that your knees are at risk. The knee can get locked, hyper extended, twisted or bent to the side.
- The front knee gets injured by locking it. Locking the front knee is caused by hyper extending the knee joint backwards. This will cause the bones of the joint to jam together.
- The back knee gets injured by twisting it. The shin is twisting one way and the thigh is twisting the other. This twisting results from the movement of the hip towards the front leg and the back foot is not placed correctly on the mat. This will cause the ligaments around the knee to be stressed.
- The back knee can be injured by the back leg bending to the side towards the floor. In this situation the back leg is bending down towards the floor at the knee joint. This bend results in the ligaments around the knee getting stretched on the lower side of the knee as the leg sags towards the floor. This is not a good thing.
There are several things that you can do to protect your knees and prevent these injuries.
What can you do to protect your knees in this pose
Of the two knees, the front knee is the one most often at risk. It is quite common to lock the front knee in this pose. Developing a twist or sag in the back knee is less common.
Protect your Front Knee from locking
The front knee is at risk due to the tendency to hyper extend or lock the knee joint. This can be avoided by slightly bending the front knee.
First of all you need to get the placement of the front foot correct. The foot should be flat to the floor, and pointing straight ahead. The leg is straight and the knee should be soft but straight as well.
You get a soft knee joint by gently flexing or micro bending the knee joint. You only bend it a small amount.
In the beginning this will be really difficult to do. You will bend it a small amount and then suddenly the knee will snap back and lock or it will pop up and you have a large bend in the knee.
You need to repeatedly attempt this micro bend over an extended period before it will become second nature and you are able to hold it in this slightly flexed state.
Protect your Back Knee from twisting
The back knee is usually exposed to a twisting action in this pose. This twisting action results from the back foot pointing out to the side at 90 degrees while the hip is moving towards the front of the mat.
You can remove this twisting in the knee joint by turning the back foot slightly towards the front. The foot and the knee should both be pointing in the same direction.
Protect your Back Knee from bending to the side
There is a small tendency to let the back leg sag towards the floor at the knee joint. This results in stress to the ligaments around the knee. You can correct this by pushing the heel of the back foot into the floor, moving the ankle back over the foot and lifting the arch of the back foot.
All of these actions result in making the back leg very active causing the muscles to engage and the leg to straighten. This will remove the sag from the leg.
When should you make sure your knees are safe
There are three times that you should make sure that your knee joints are well aligned and slightly flexed.
1 – Entering the pose
As you are entering the pose you need to check your knee joints. Make sure the front knee is slightly flexed and that the back leg is properly aligned to prevent twisting and sagging in the back knee.
2 – In the pose
While you are in the pose you need to monitor the state of your knees. It is quite common for the front knee to suddenly snap backwards, hyper extend and lock. Once this happens you need to restore the micro bend and slightly flex the front knee.
Check the alignment of the back leg. The back leg can gradually start to sag as you hold the pose and this can cause stress to the ligaments of the knee. Once you become aware of this sagging. Lifting the arch of the back foot and moving the ankle over top of the foot will usually correct this sagging.
3 – Leaving the pose
This is another time when the front knee is likely to snap backwards and lock. Bring your awareness to the front knee as you start to exit from the pose to prevent the knee from locking.
But, my knee will not stay slightly flexed
When you are first learning to keep your knee flexed in this pose it is quite common for it not stay where you want it to. It will either pop up into a large bend or snap backwards and lock. The only solution for this is lots of practice and persistence. Monitor the knee and restore the micro bend, every time it goes away. Over time the knee will stay in the micro bend for longer periods of time.
Does the risk to the knee go away once I am flexible
The knee is one of the most unstable joints in the body. Yoga will make your body more flexible over time and it will strengthen your muscles and ligaments. As the body gets more flexible and you learn good alignment for the yoga poses you are less likely to cause stress to your knees and other joints.
Unfortunately the knee joint continues to be at risk due to hyper extending, locking or twisting. The risk to the knee does not become less as you get more flexible.
Summary
Trikonasana is one of many standing yoga poses that can cause injury to your knees if you are not careful with your alignment.
The knee joint is exposed to hyper extending, locking, twisting and sagging forces that can cause bruising to the joint itself and the ligaments around the knee.
Following the actions described above: Flex the front knee to prevent locking; align the back leg to prevent twisting and straighten the back leg to prevent sagging will protect your knees and keep them healthy.
Next Step
The next time you do Trikonasana ask your teacher to check your alignment and help you to protect your knees.