
This number can help you gain flexibility in your hips.
Bob is working on being able to do Padmasana the full lotus pose. But Bob has a problem. He has limited flexibility in his hip and thigh joint. Padmasana requires a lot of external rotation of the thigh.
When Bob brings his ankles on top of his thighs his knees are way up in the air. If Bob is not careful he could injure his knees as he attempts to lower his knees towards the floor. Bob needs to develop more external rotation in his thigh joint before he can make progress with Full Lotus.
Recently Bob’s teacher introduced him to “Rock the Baby” pose which focuses on developing external rotation in the thigh and hip. Now Bob ‘s teacher is introducing him to the Figure 4 pose which is another pose that focuses on that external rotation.
What is the pose
Supta Eka Pada Utkatasana is the Sanskrit name of this pose which translates as “Reclining one foot fierce pose”. There is a standing version of this pose as well as a reclining version. Bob’s teacher is teaching him the reclining version so he can focus on the external rotation of the thigh and not have to worry about balancing on one foot.
How to do the pose

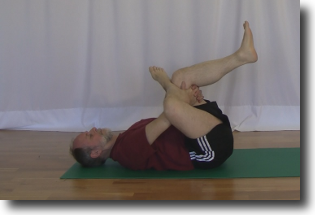
The figure 4 pose from the front
You do the Figure 4 pose by first laying on your back, bending your knees and drawing your feet towards your hips.
Leave your left foot on the floor and bring your right ankle up on top of your left thigh at the knee. The right knee is out to the side and parallel to the end of the mat.
Now lift the left foot off of the floor and bring the left shin up parallel to the floor.
Take your left hand around behind your left knee. Take your right hand through the hole created by your right and left leg and behind your left knee. Interlace the fingers of your hands and hold onto the back of your left knee.
This is the initial setup for the pose. Now we work on the external rotation of the thigh.
While holding on to the left knee, bend your right elbow and bring it against your right thigh just below your right knee. At the same time bend your left elbow and lift your torso up off of the floor towards your right shin. This action will draw the shin closer to the chest and require more external rotation of the thigh in the hip joint.
Why do the pose
The figure 4 pose from the side.
The Figure 4 pose is another of a series of poses that focuses on the external rotation of the thigh in the hip joint. This is an excellent complement to the Rock the Baby pose. In the Rock the Baby pose there is a tendency to let the top of the hips fall backwards and for the back to round. When this happens there is less lengthening of the muscles in the hip joint and there will be less external rotation in the thigh.
With the Figure 4 pose there is less rounding of back because you are laying on your back. When you lay down your are forcing your back and hips to stay in a straight line and this puts more emphasis on the external rotation of the thigh.
Common Mistakes
Your right knee comes towards your head faster than your right ankle
One of the common mistakes is letting the right knee come closer to your chest than the right ankle is. When you do this you remove all of the stretching in the right hip and thigh joint. You will develop less external rotation in your thigh when this happens.
You need to make sure that your keep your right shin parallel to the end of the mat. You accomplish this by putting your right elbow against your right thigh just below your right knee and then drawing the left knee towards your chest. It is this action of holding your right knee stationary and drawing the right ankle towards the chest that works on the external rotation of the thigh in the hip joint.
Your right ankle is too close to your hip
Another common mistake is to put the right ankle on the left thigh closer to the hip rather than at the left knee. There is less external rotation in the thigh when the right ankle is closer to the left hip.
To avoid this mistake check to make sure that your right shin is parallel to the floor. Both your right knee and your right ankle should be the same height from the floor. Move your right ankle up towards your left knee until it is the same height as your right knee. This will increase the amount of external rotation in your right thigh and hip joint.
Summary
Bob is using the Figure 4 pose in combination with the Rock the Baby pose to develop greater external rotation in his thigh and hip joint and soon he will be making progress in his quest to do Padmasana.
Next steps
Ask your teacher to help you with setting up the Figure 4 pose. They can also make sure that you avoid the common mistakes and insure that you get the maximum benefit from the pose.
Bob is working on being able to do Padmasana the full lotus pose. But Bob has a problem. He has limited flexibility in his hip and thigh joint. Padmasana requires a lot of external rotation of the thigh. When Bob brings his ankles on top of his thighs his knees are way up in the air. If Bob is not careful he could injure his knees as he attempts to lower his legs towards the floor. Bob needs to develop more external rotation in his thigh joint before he can make progress with Full Lotus.Recently Bob’s teacher introduced him to “Rock the Baby” pose which focuses on developing external rotation in the thigh and hip. Now Bob is learning the Figure 4 pose which is another pose that focuses on that external rotation.What is the pose
Supta Eka Pada Utkatasana is the Sanskrit name of this pose which translates as “Reclining one foot fierce pose”. There is a standing version of this pose as well as a reclining version. Bob’s teacher is teaching him the reclining version so he can focus on the external rotation of the thigh and not have to worry about balancing on one foot.How to do the pose
You do the Figure 4 pose by first laying on your back, bending your knees and drawing your feet towards your hips.
Leave your left foot on the floor and bring your right ankle up on top of your left thigh at the knee. The right knee is out to the side and parallel to the end of the mat.
Now lift the left foot off of the floor and bring the left shin up parallel to the floor.
Take your left hand around behind your left knee. Take your right hand through the hole created by your right and left leg and behind your left knee. Interlace the fingers of your hands and hold onto the back of your left knee.
This is the initial setup for the pose. Now we work on the external rotation of the thigh.
While holding on to the left knee, bend your right elbow and bring it against your right thigh just below your right knee. At the same time bend your left elbow and lift your torso up off of the floor towards your right shin. This action will draw the shin closer to the chest and require more external rotation of the thigh in the hip joint.
Why do the pose
The Figure 4 pose is another of a series of poses that focuses on the external rotation of the thigh in the hip joint. This is an excellent complement to the Rock the Baby pose. In the Rock the Baby pose there is a tendency to let the top of the hips fall backwards and for the back to round. When this happens there is less lengthening of the muscles in the hip joint and there will be less external rotation in the thigh.
With the Figure 4 pose there is less rounding of back because you are laying on your back. When you lay down your are forcing your back and hips to stay in a straight line and this puts more emphasis on the external rotation of the thigh.
Common Mistakes
Your right knee comes towards your head faster than your right ankle
One of the common mistakes is let the right knee come closer to the head than the right ankle is. When you do this you remove all of the stretching in the right hip and thigh joint. You will develop less external rotation in your thigh when this happens.
You need to make sure that your keep your right shin parallel to the end of the mat. You accomplish this by putting your right elbow against your right thigh just below your right knee and then drawing the left knee towards your chest. It is this action of holding your right knee stationary and drawing the right ankle towards the chest that works on the external rotation of the thigh in the hip joint.
Your right ankle is too closer to your hip
Another common mistake is to put the right ankle on the left thigh closer to the hip rather than at the left knee. There is less external rotation in the thigh when the right ankle is closer to the left hip.
To avoid this mistake check to make sure that your right shin is parallel to the floor. Both your right knee and your right ankle should be the same height from the floor. Move your right ankle up towards your left knee until it is the same height as your right knee. This will increase the amount of external rotation in your right thigh and hip joint.
Summary
Bob is using the Figure 4 pose in combination with the Rock the Baby pose to develop greater external rotation in his thigh and hip joint and soon he will be making progress in his quest to do Padmasana.
Next steps
Ask your teacher to help you with setting up the Figure 4 pose. They can also make sure that you avoid the common mistakes and insure that you get the maximum benefit from the pose.