
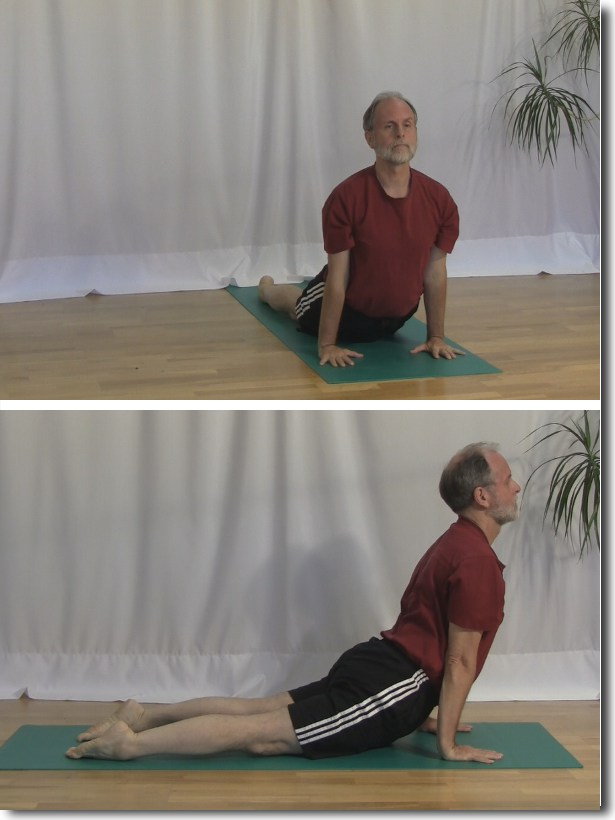
Upward Facing Dog from the front and the side.
Upward Facing Dog is one of the positions in the Sun Salute. As you can see in the picture your arms are straight with your shoulders over your fingers and your legs straight out behind you.
There are several ways that you can injure yourself in this pose if it is done incorrectly.
Where can you injure yourself in Up Dog
There are three common places that you can injure yourself in up dog.
- The first place is in the upper back by letting your shoulders rise up towards your ears and forward in front of your chest.
- The second place is in the lower back by forcing your hips forward and down.
- And finally the third place is in the hands.
Lets take these one at a time and look at how you can avoid injuring yourself in this pose. First let’s look at the upper back.
1 – Fixing the upper back
To avoid injuring your upper back and neck move your shoulders back and down away from your ears. Lift your torso up between your shoulders and hold your head above your shoulders while you look towards the horizon.
Moving the shoulders back and down while lifting your torso up will relieve the stress on the muscles of your upper back, neck and shoulders.
In addition to the placement of your shoulders the placement of your head can also cause stress in your upper back, neck and shoulders.
Lifting your head and looking up to the sky can cause sever strain in the back of the neck and the upper back. You can avoid this by keeping your head level, above your shoulders and looking to the horizon.
You need to protect your upper back, lower back and wrists in Up Dog.
Now that you have corrected the alignment of your shoulders, torso and head to remove strain from the upper back, neck and shoulders let’s move on to examine the lower back.
2 – Fixing the lower back
Stress to the lower back muscles is usually caused by pushing the hips downwards towards the floor and forward between the arms.
You can avoid the compression and stressing of the lower back by moving the lower ribs forward between the arms and letting the hips follow.
In addition to moving the ribs forward you also want to have your feet in the correct position on the floor.
Firstly the top of your feet should be to the floor with your toes pointing back and away from you. There should be a gap of 6-8 inches between your feet.
Next you need to move your feet forward and back slightly. This slight movement will help to relieve any remaining compression in your lower back.
Do not force the hips down towards the floor. As the flexibility in the hips and lower back develop you will find that the hips will gradually descend towards the floor and the curve in the back will develop naturally.
Now that we have the upper back and the lower back taken care of it is time to move on to the third area of potential injury, your hands
3 – Fixing your hands
Because all of your weight is supported by just your feet and your hands there is a strong chance to injure your wrists if your hands are not properly aligned.
Your hands should be shoulder width apart. The arms should be coming straight down from your shoulders. If they are wider than your shoulders then you will be placing excessive pressure on the inside of the wrists. This is not a good thing. Check to make sure that your arms are straight up and down and that your hands are under your shoulders and not out to the side.
Your hands should also be flat to the floor with the fingers spread wide and the fingers pointing straight ahead. If the hands are cupped on the floor this will shift the weight of the body to the outside edge of the wrist. Again this is not a good thing. Check to make sure that the hands are flat to the floor and the fingers are spread.
Finally you need to share the weight of body between the wrists and the top of the palms. You do this by gripping your yoga mat with your fingertips. Shifting the weight between your wrists and the top of the palm will reduce the pressure on the wrists.
Lastly move the shoulders forward so that they come towards the top of the palm. This will also help to reduce the pressure on your wrists.
Summary
There are three areas that you can cause injury to yourself in Up dog and there are things that you do to reduce or eliminate these areas of stress.
- Upper back – Keep your shoulders down your back away from your ears and your head level
- Lower back – Bring your ribs forward between your arms and adjust your feet slightly forward and back
- Wrists – Keep your hands flat to the floor, under your shoulders and share the weight between your wrists and the top of your palms.
Next Steps
Practice your yoga postures with care and listen to the feedback that your body is giving you. When your body says it hurts adjust your alignment to remove the discomfort.